
User Guide
Welcome and thanks for joining!
Security
Many of our users are new to the worries and obligations of being a small business owner. If that’s you: welcome! If you’re doing this correctly, you’re going to have a lot of important data that you need to keep safe. For example, you’ll likely have an inventory spreadsheet in Google sheets or a similar cloud service and you’ll likely have images of gift cards on your phone and/or any cloud backup service you use.
One reason we require you to use a Google account to login to our site is because Google has robust security features that we can’t build as good as they can. Make you’re that you’ve turned on things like 2-factor authentication within your Google account and make sure you’re using a strong, unique password. If you recycle passwords across accounts then if any single website gets compromised then all of your accounts are compromised. If you believe at any point that you’ve been hacked, there is not much we can do to help you. If you inventory was exposed then you’ll likely need to use those cards yourself before the thief does and you’ll be subject to substantial debit fees then the cards are all empty. Don’t let yourself get into that mess in the first place by practicing good personal security.Payment Setup
Once you’ve signed up for the site you’ll want to tell us how to pay you by going to the “Payout Setup” page on the left side of the portal, under account settings.
We use ACH so we need your routing and account number as well as the account type (checking or savings). Payment will be sent using the name on your account so you should only add bank accounts you control.
You can find your ACH and Routing numbers on your bank’s website. Your bank might offer two different routing numbers: one for wires and one for “paper and electronic” or “ACH” transfers. We want the latter because we are NOT sending a wire, we are sending an electronic ACH transfer. Save the info and within 1-2 business days we will send trial deposits.
IMPORTANT NOTE
Do not try to verify your account until you have actually received the test transactions from us. If you guess incorrectly, you’ll be locked out of verifying that account until you send us a copy of your bank statement.
Once you see these transactions you need to go back to the payout tab and verify your account by clicking verify next to the account and entering the amount of money that was pushed (and pulled).
Gift Cards
Buying Your First Deal
HIDING/UNHIDING DEALS
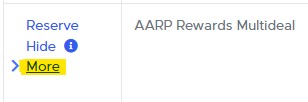
See that hide button just above the “More” button? A lot of people click that by accident. So many people that we put a tooltip button next to it that tells you how to unhide things but most people don’t seem to read those so we’ll also tell you about it here:
Your dashboard represents a subset of active deals that you have curated. You can hide deals from this page by clicking the hide button on deals you don’t care about. Further, in your notification settings, you can check “Check this box to auto-hide deals from your dashboard that do not meet your notification requirements”. If checked, we will hide any deals you didn’t get an email about. To view a complete list of all deals go to the “Deals” page under the “Gift Cards” section of the hamburger menu. If you see a deal there you want to unhide then view the full deal details and click the “Show on Dashboard” link at the bottom.Click the “Reserve” link in the left column to get the full details (and the option to request a reservation). There’s a lot of info on this page so let’s break it down:
Anatomy of a Deal
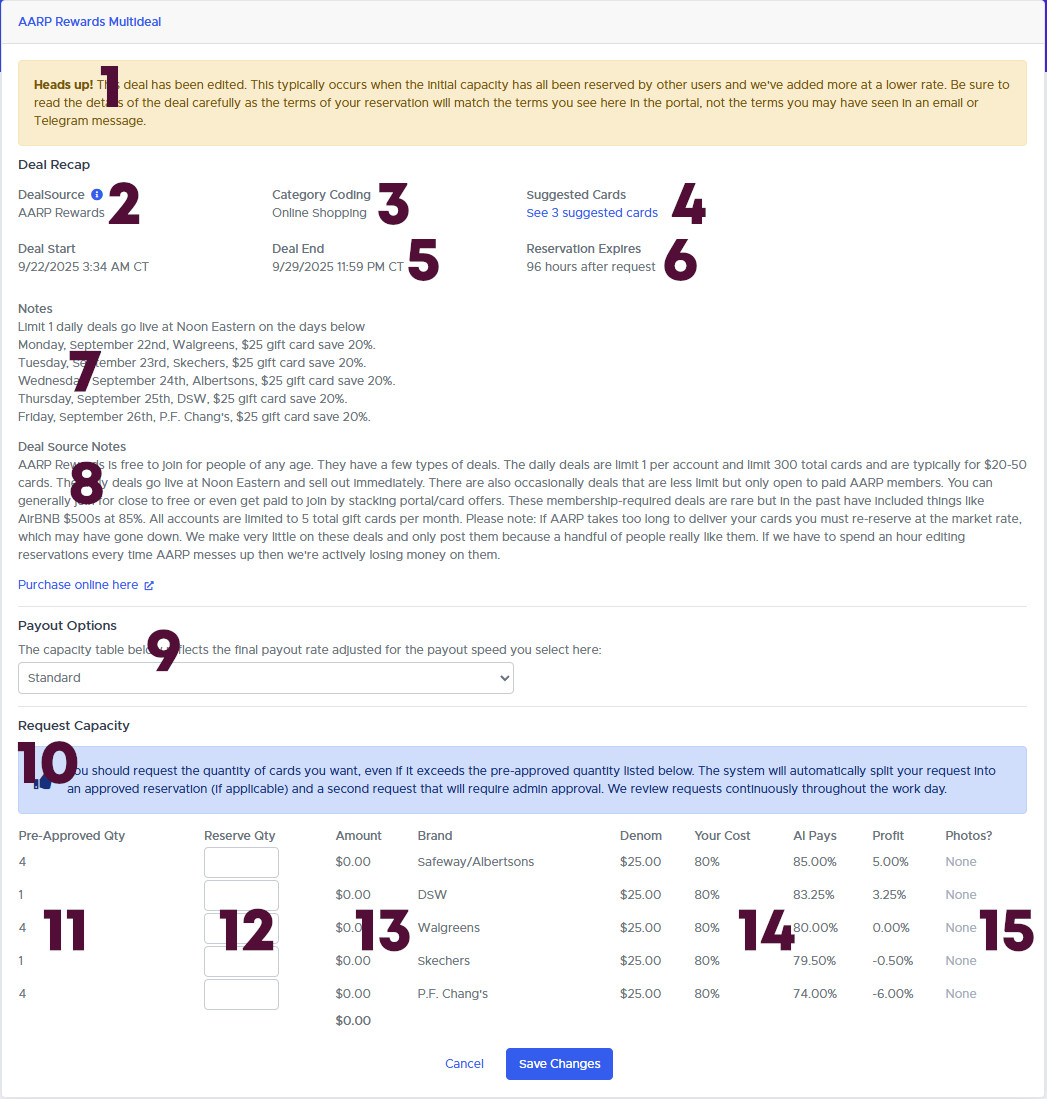
1 – Edited Deal Warning
Deals change in real time based on your actions, the actions of other members, and of the market. We might add/remove brands, add/remove capacity, change rates, or update the deal notes as we get new info. If we change anything at all about the deal, you’ll see this yellow message at the top of the screen to remind you to double check the details.2 – Deal Source
FREQUENT MISUNDERSTANDING
The deal source tells you where we found the deal but you’re not required to get the cards there. For example, at any given time there are usually half a dozen places selling Lowe’s $500 gift cards. As long as you’re buying from a source that follows our Terms & Conditions, you’re welcome to upload cards into any deal that accepts them. Secondhand cards are never allowed. If you bought your cards in-store you must upload receipts even if the deal you’re submitting them into does not require them.
3 – Category Coding
For each deal source, we tag the Merchant Category Codes that we think might apply to the source. This can be helpful because some sources code weird. For example: Kroger in-store codes as a grocery store but Kroger.com does not.4 – Suggested Cards
For each Merchant Category Code we maintain a list of cards that are supposed to earn a bonus for that category. If you click the link you’ll see that list. We don’t always remember to update this list when things change (e.g. the rotating quarterly categories on Discover/Chase Freedom) so double check with your actual card. These aren’t referral links and we don’t earn any money from this feature, it is just an FYI for you.5 – Deal End
This is the time we think the deal ends in the real world and the time that the deal does in fact end on the portal. You cannot see the deal or create a new reservation once the deal ends however if you already have a reservation your reservation may outlast the deal because reservations have their own expiration times. Because you should always reserve before buying gift cards you should not need to open a reservation after a deal ends.6 – Reservation Expires
This tells you when your reservation expires. For most deals it is a fixed number of hours from the time your reservation is approved. In select deals there might be a fixed date and time that all reservations are due by.7 – Deal Notes
These are notes we wrote specifically about the current deal. Please read them in full because they often contain important caveats and address questions we anticipate being asked.8 – Deal Source Notes
These are notes with tips for the store where the deal is at. These notes change less frequently because they have advice that is common to all deals from that source, not just the specific deal you’re looking at.9 – Payout Options
On most deals we offer a variety of payout speeds and choosing a slower speed gets you a higher payout. The payout bonus is based on the amount we owe you. If we’re paying 90% of face value for the card, a 1% bonus is calculated as 90% * 101% = 90.9%. But you don’t have to do any math because if you pick an option from the dropdown the rates in the table will update to reflect the bonus.10 – Request Capacity Note
A LOT of users ignore this note despite the fact that it is called out in a bright blue box. Here it is again: “You should request the quantity of cards you want, even if it exceeds the pre-approved quantity listed below. The system will automatically split your request into an approved reservation (if applicable) and a second request that will require admin approval. We review requests continuously throughout the work day.” Learn more about Capacity below.11 – Pre-Approved Quantity
This tells you the quantity of cards for which you will likely be instantly approved. I say likely because other users are also reviewing the deal and reserving capacity just like you. If other users reserve all of the capacity while you’re reading the page then your reservation might go pending despite the fact that you saw pre-approved capacity available here.12 – Reserve Quantity
This is the number of cards you want to reserve. If you want 2 $50 cards type “2” in the box, not “100.”13 – Amount
This auto-calculates by multiplying the quantity you entered by the denomination of the card to try to stop people from typing in 100 when they mean 2.14 – Cost/Pays/Profit
Under “Your Cost” we offer our estimate of what the deal will cost you, the methodology for which is generally described in the Deal/Source Notes section. If the deal involves getting points back, for example, you might value the points differently from us. This column is just there to give you a starting point, it is not a substitute for reading the deal and coming up with your own idea of what the cost is. “AI Pays” is what we will pay you as a percentage of the face value. Profit is AI Pays minus Your Cost, yielding profit expressed as a percent of face value of the card rather than in ROI terms. Again, because your cost might be different than what we suggest, it is incumbent upon you to determine if a given deal makes sense for you.15 – Photos
If photos are required for this deal, we list those requirements here. Read the photos section to learn more about that.Capacity
You’ll see a lot of references to “cap” or “capacity” throughout this guide, the portal, and our Telegram. What is it? It refers to three different kinds of limits we place on your ability to reserve things.
Global Capacity
This is the total dollar value we’re willing to take of a given SKU (Brand + Denom) at a given price. Typically, this is what we expect we can sell in around two weeks. In most cases, if all this capacity gets reserved, we will add more at a lower rate. If your reservation went pending because we ran out of global capacity then, if we add more capacity at a lower rate, your pending reservation will likely be denied with a note encouraging you to submit a new request at the new rate if you’re still interested. If you have an approved reservation then future changes to rate and capacity will not affect it, we honor approved reservations except in cases of a typo or clerical error on our part.Source Capacity
Some sources might offer a wide variety of denominations but a tight limit on the total dollar amount you can spend. For example, MyGiftCardsPlus might be selling 5 different denominations of a brand and we might want to buy all of them but they have a $500 user limit. We would be happy for you to sell us $500 of any of the denominations but we don’t want you to reserve $500 of each because we know you won’t actually be able to fulfil $2500, so we might set a source capacity limit of $1000 to prevent people from hogging capacity they are unlikely to fill. If you fulfill your existing capacity from this deal source you can reserve more. If your reservation request goes pending for exceeding the source limit we will likely approve it in 1-2 business hours provided the rate hasn’t gone down.User Limits
To give more people a chance at the best rates, every line of a deal has a user limit defined and you can see it when you’re creating a reservation. If you exceed it your reservation will be split into an approved reservation up to your limit amount and then into a pending reservation for the overage. During business hours, if your reservation is pending for user limit reasons, we will likely approve it in 1-2 hours if the rate has not gone down. User limits reset at midnight Central and they also increase as you submit gift cards you’ve already reserved so you’re encouraged to submit as you go and create additional reservations as needed.Submitting Cards
Step 1: Open Your Reservation

RESERVATION STATUS
Here is a list of possible gift card reservation statuses and what they mean: Approved – Your reservation is active and no cards have been submitted into it yet Cancelled – You or an an admin cancelled your reservation or reservation request Denied – You requested a capacity overage and it was denied Expired – Your reservation expired and no cards were submitted Incomplete – Your reservation expired and some cards were submitted but not all Partial – Your reservation is active and some cards have been submitted into it
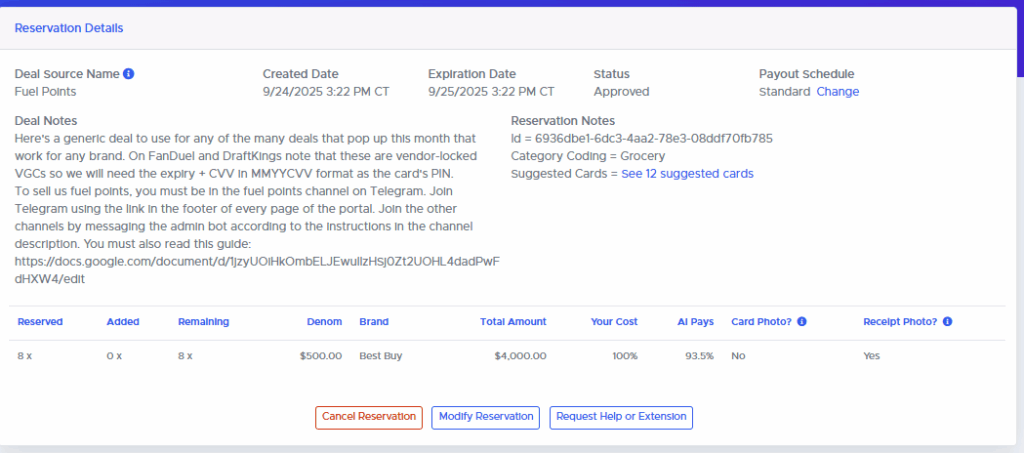
IMPORTANT NOTE
Want to increase the number of items in your reservation? That is not an option. Instead, create a new reservation for the additional cards you want to submit.
Step 2: Add Cards
The second block of the page is where we add cards:
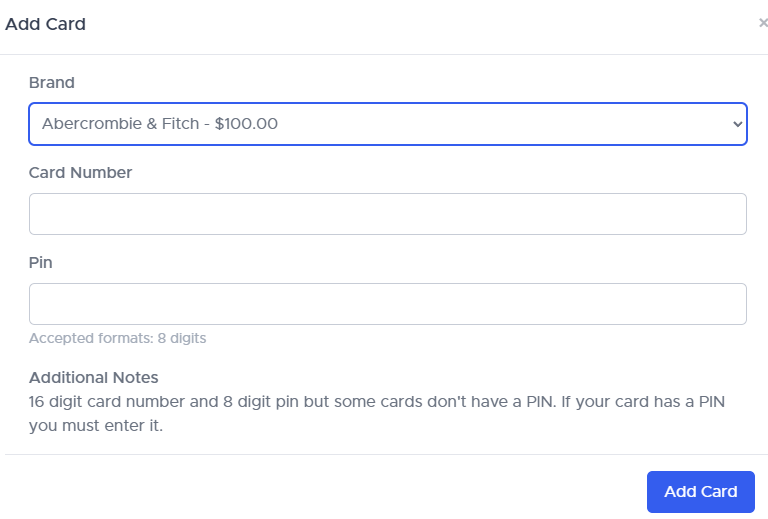
CAUTION
If you enter the wrong denomination at this step, you’ll be very sad! If you’re supposed to submit a $250 and typo it as $25 and the card sells, we have no mechanism to get the money back! Always double check! We rely on the data you provide us to market your cards. If you are trying to submit a denom that is not part of your reservation, DO NOT just pick any random denom we are accepting. Reach out to an admin BEFORE UPLOADING ANYTHING and explain what denom you need changed and why. Most deals are denom-sensitive and we are only accepting the listed denoms for a reason. If we can accept your denom at all, you need to wait for an admin to edit the accepted denoms on your reservation before you upload anything and you need to be prepared for the possibility that we are not interested in other denoms at all.
CAUTION
If you stop here, you have NOT submitted your card and you will not be paid. Adding a card adds it into the reservation as a draft. To sell the card and get paid, proceed to step 3.
Step 3: Add Images and Submit Cards
If your reservation requires images or if you just want to include them, use the “Add Photo” button to do so. Next, read and accept the Sales Agreement. The sales agreement includes a version number and last updated date so it is easy to see if it has changed since you last read it. Finally, click “Submit Gift Cards.” Congrats! You’ve sold your first gift card! If you view the reservation you should see the card you added there with a “Submitted” status. If you see that you’re all set and there is no need ask us to confirm that we received the card. We would verify it by doing exactly what I just described to you.FREQUENT MISUNDERSTANDING
Some users (ones who didn’t read this guide) get the incorrect impression that once they submit anything into a reservation the reservation disappears. That is not so! You are not required to fulfill an entire reservation all at once. If you had a $10,000 reservation, for example, you could submit $1,000 each day, as you process the cards. If, for example, you submit $5,000 on Monday and $5,000 on Tuesday, the cards you submitted on Monday will be paid one day before the cards you submitted on Tuesday, as cards are paid 14 days after the card is submitted, with no regard for when the reservation was totally fulfilled. We encourage you to upload cards as you go. Once you’ve added cards to a reservation there is no reason not to submit right away, you can always submit more tomorrow (assuming your reservation has not expired and you still have capacity reserved).
Bulk Uploads
Here’s a video walkthrough for bulk uploads if you don’t want to read: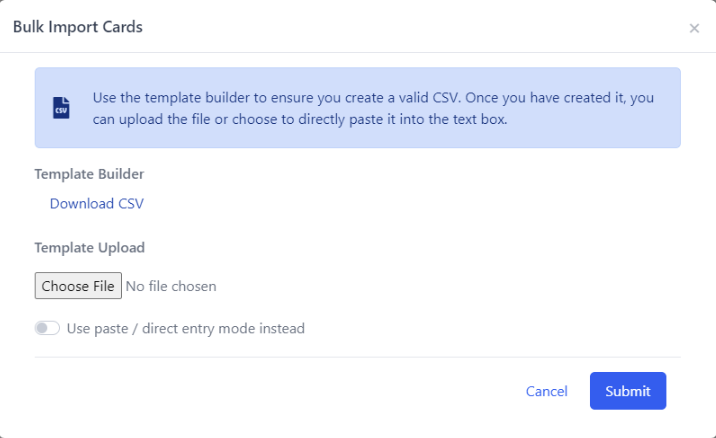
Tracking Your Inventory
We do not require that you track your own inventory on a spreadsheet (although, per the terms, we require that you hold onto your card and proof of purchase for a year after selling it to us). However, the unanimous advice you will hear from anyone in our Telegram channel is “I wish I had done a better job of tracking my inventory on day 1.” To that end, we’d like to point you to GCGalore.com’s guide on tracking inventory as many of our sellers use his sheet and find it helpful. After you read Stephen’s guide, allow me to make a few suggestions for additions that you can find on our adaptation of the sheet here. Column A – UUID, this is a unique inventory serial number so that it is easier for you to track your inventory on the site. Once you submit your cards, we no longer let you access the full card number or pin on the site in case your account were to be compromised but we do let you see your card notes which you can cross-reference to your inventory. If you add more rows to the sheet, you’ll need to copy down new UUIDs as well. Column B – AI Export, this column automatically formats the data into a CSV. You can copy this cell for any lines you need to add to your reservation: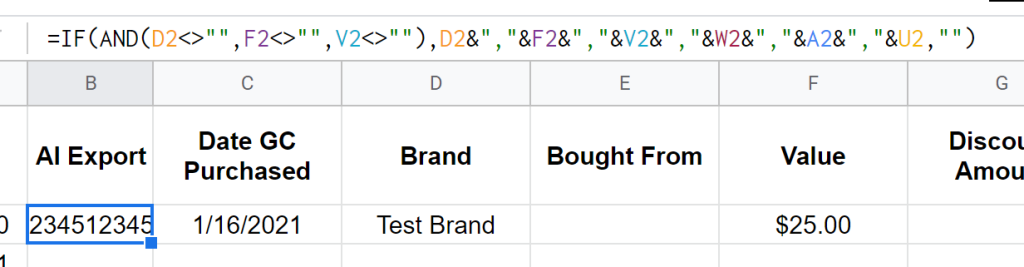

Spreadsheet Formatting
…or “why do all my card numbers end in 0?”
Excel tries to “help” you by automatically recognizing your data format and then formatting each cell accordingly. The result is that if you give excel a very long string of numbers (like a card number) it thinks you are describing a very large quantity and helpfully converts that to scientific notation for you. If you use our sheet we have preformatted the necessary columns as text to prevent Google Sheets from making that same error. If you’re setting up your own sheet from scratch, however, you’ll need to do that as well. Select the columns at issue change the cell formatting type to “Text”. You have to do this prior to adding data to the column because once Excel has converted a number to scientific notation it has already discarded the last digits of the number and you cannot bring them back. The same issue occurs if you open a CSV in Excel. If you simply double click on the CSV file Excel will helpfully discard the last digit of every card number and turn it into scientific notation as well as trim any leading 0s from your PINs. You can get around this by importing the CSV into excel and telling it not to automatically detect the data type.Scanning Cards
Almost every card has a barcode on it but this is not always useful for entering the card data. For some brands, the barcode is only used for activation. You can see when this is the case because the number under the barcode will be far longer and different from the actual card number. If, however, the number under the barcode is also the same as the card number then you can use either a dedicated barcode scanner (buy the cheapest one you see on Amazon, or get one that scans slower but can handle 2d codes like Starbucks) or a free app for your smartphone like OrcaScan. Because you can easily scan barcodes for free from your phone, we don’t recommend buying a scanner unless/until you find that you’re regularly entering large amounts of barcode scannable cards. If the barcode on your card does not contain useful data but the card has a magnetic strip on it then that strip likely contains the card data (the only exception I can think of is Delta which has a purely decorative black stripe on it), generally in a format that is hard for humans to read. However, you can submit this magstripe data to us on the website and the site will decrypt it.HOT TIP
If you get a message that the site can’t handle the swipe, reach out to us with the swipe data and the card number and we will set it up as we don’t have that data on hand for every brand.
Images
There are two kinds of images we can require: card and receipt. We require card images for any cards that must be hand-typed e.g. Uber, AirBNB, Xbox, etc. because the alpha-numeric codes must be hand-typed we get many typos: we are trying to save you from yourself. If a card has a typo, we will use your images to try to fix it promptly. This happens in the background and you are not debited if it occurs but you will get a nudge email letting you know to step up your typo game and billing you the $2 typo/debit fee. If you don’t have images or if the images aren’t legible, however, we will debit you for the card and you’ll have to find the card and fix the typo yourself. We require images here to make your life easier. We do not look at them unless you have a debit. You will not be penalized if you don’t include them (unless deal notes say otherwise). If you are submitting EGC into a PGC deal then simply mark your receipt image(s) as containing both card and receipt. You can include multiple cards in a single image but if we can’t read the card numbers then we’re obviously not going to be able to fix your typos for you. The other kind of image we can require is a receipt image. These images are required any time a deal could be purchased in-store. One example would be a Target deal that works in-store and online. We have no way to know whether you bought the cards in store on online and might require receipt images for all of them.FREQUENTLY ASKED QUESTION
I bought these gift cards online but I am submitting them into an in-store deal. Is that allowed? How do I submit a photo of my receipt?
Answer: Yes, provided your cards otherwise comply with our terms and conditions you can submit cards you bought online into an in-store deal. Instead of a ‘photo’ you’d be submitting a screenshot of the receipt. The receipt requirement is to prevent money laundering and we are not checking store names when we audit images; we are just making sure that the purchase was for the items you submitted and not paid for with cash.FREQUENTLY ASKED QUESTION
What if I need to add or correct an image? You can request help in your reservation and choose “Adding an Image” as the type of request, which will allow you to upload and categorize new images.
Debits
Debits are an unfortunate eventuality of the business. If you get a debit from us, there will always be an associated email with 1. Notes specific to your debit and 2. General advice for next steps on debits. You should read that email in its entirety! The general advice we give in that email is: 1. Balance check the card to see if it has the correct balance. Sometimes the end customer’s purchase is cancelled and the funds are locked for a while then eventually unlock. It looks empty to them, they dispute it, and then nothing is actually wrong. However, note that some brands cannot be balance checked. If your card has the full and correct balance then reply back [to the debit email] and let us know. 2. Check for typos. If the card is physical, the top source of issues is typos for any part that you hand-typed. Pull the physical card from your inventory and compare the card number and PIN to your records. Do they match? If they don’t, it means the numbers you submitted to us are also wrong so use the new reservation above [in the actual debit email, if your card was invalid, we typically will include a link to a new re-submission reservation] to submit this corrected card info to us. 3. Gather evidence for a dispute. The better your evidence, the better your odds of prevailing with our marketplace partner. We pass your evidence on to the marketplace and then they decide. The gold standard for evidence would be an online transaction history showing the date and location it was redeemed. The next best thing would be if you called [or emailed] the brand and got whatever info you can about the redemption (date, time, city, and/or the name of the person who used it). Weaker evidence would be a photo of the card (or screenshot) as well as your receipt. With no evidence about when, where, and/or who redeemed the card your chances of success are a lot lower [nearly zero] so we strongly encourage you to contact the brand and get any info you can. You simply tell the brand that you cannot redeem the card and you’re trying to figure out when/where/who used it as you do not believe you used the card yourself.IMPORTANT NOTE
All debit communications should happen via email. Our emails contain info identifying your card, making it easy to know what you’re talking about. Simply reply to one to open a dispute.
The Ledger
Our site works like a ledger and accounting lines are only ever added, never removed. If you sell us a card, it gets debited, and then later you win a dispute you will see each event in your payout logs. The debit never goes away: you get an additional credit, instead. It might look like: May 5 – +$45 for card X (your original sale) May 15 – -$45 for card X (the debit) May 30 – +$45 for card X (your correction and/or successful dispute) If you are debited on a card with an extended payout that is in the future, the debit will appear on that future payout so that it is net neutral. Otherwise the debit will appear as though it were a card you have just sold us, only with a negative amount. If your payout is negative but you have positive payouts in the near future we will typically just roll your negative balance forward and cover it with future payouts. If there aren’t sufficient payouts in the near future we may do an ACH pull.Choice, Zift Zillions, and One4All Cards
A trend in the world of gift cards for the last few years has been cards that work with multiple retailers. The first ones were the Happy, Choice, Giving Good, and One4All cards from Blackhawk Networks followed by a similar line from InComm called Zift/Zillions and ChooseYourCard.IMPORTANT NOTE
Some Choice (aka One4All Favorites) cards say “Enter as Credit.” These are Visa gift cards locked to only work at certain retailers. We suggest that you avoid these. It might be possible to use them to purchase gift cards online directly from the retailer but it also might not work, in which case the only way to resell it would be to go into a physical location and purchase a gift card. If the cashier sees that you’re paying with a Choice card they might incorrectly tell you that you’re not allowed to do that, in which case you’d need to try again at another location. You can see how this can quickly become a waste of time. Instead, you will see that they also sell some that say “Online Exchange Required”